Mastering Sourdough Scoring Patterns: Art & Science Of The Perfect Loaf
Sourdough, a specific type of bread created through a natural fermentation process involving suitable bacteria and wild yeasts in the environment, has captivated bakers for centuries. More than just a food, it's a living art form, from the bubbling activity of the starter – a combination of flour and liquid that captures those natural yeasts – to the final, crusty loaf. While the magic of fermentation does most of the heavy lifting, allowing the sourdough starter and time to do all the work, there's a crucial step that transforms a simple dough into a masterpiece: sourdough scoring patterns.
This intricate practice, often seen as the baker's signature, is far more than mere decoration. It’s a vital technique that influences the bread's rise, texture, and overall appearance. For beginners learning how to make the easiest homemade sourdough bread recipe, mastering the basics of scoring is just as important as understanding the fermentation itself. This comprehensive guide will delve into the world of sourdough scoring patterns, demystifying the art and science behind achieving that coveted "ear" and beyond, ensuring your homemade sourdough bread reaches its full potential.
Table of Contents
- What Exactly is Sourdough Scoring?
- Why Do We Score Sourdough? The Functional & Aesthetic Imperatives
- Essential Tools for Precision Sourdough Scoring
- Understanding the Basics of Sourdough Scoring Patterns
- Popular Sourdough Scoring Patterns for Beginners
- Advanced Sourdough Scoring Patterns: Artistry in Bread
- Troubleshooting Common Sourdough Scoring Issues
- Elevating Your Sourdough Scoring Game
- Conclusion: The Signature of a Sourdough Baker
What Exactly is Sourdough Scoring?
Sourdough scoring refers to the act of making intentional cuts on the surface of your dough just before baking. These cuts, made with a sharp blade called a "lame" (pronounced "lahm"), are not random. They are carefully planned incisions that guide the expansion of the dough during its rapid rise in the hot oven, a phenomenon known as "oven spring." Without scoring, the expanding gases inside the dough would burst through the weakest point, leading to an uncontrolled, often unsightly, rupture. By making precise cuts, bakers dictate where the dough will expand, allowing for a more controlled, beautiful, and often more voluminous loaf.
Sourdough, unlike bread made with commercial yeast, relies on the natural wild yeast from the environment that has been captured to rise and ferment. This natural leavening, which has been trusted by beginner bakers for over a decade, results in a dough with unique elasticity and strength, making scoring even more critical. The fermentation process, which also makes those nutrients more available to us by reducing the phytic acid in bread, creates a robust internal structure that needs a release valve to achieve its full potential. This is where the artistry of sourdough scoring patterns truly shines, turning a simple loaf into a testament to the baker's skill and understanding of their craft.
Why Do We Score Sourdough? The Functional & Aesthetic Imperatives
The reasons behind scoring sourdough are twofold: functional and aesthetic. Both are equally important in achieving a desirable final product.
Functional Reasons:
- Controlled Expansion (Oven Spring): This is the primary functional reason. When dough is placed in a hot oven, the yeast gets a final burst of activity, and the water in the dough rapidly turns into steam. This creates internal pressure, causing the dough to expand. Scoring provides predetermined weak points for this expansion to occur. Without scores, the crust would harden too quickly, and the pressure would cause the loaf to burst haphazardly, often at the bottom or sides, resulting in an uneven shape and a dense crumb.
- Improved Crumb Structure: By directing the expansion, scoring helps create a more open, airy, and consistent crumb structure. This is particularly desirable in sourdough bread, which is known for its characteristic open texture. The controlled rise allows the gluten network to stretch evenly, preventing large, irregular tunnels or dense pockets.
- Enhanced Crust Development: The cuts expose more surface area to the intense heat of the oven, promoting a crispier, more flavorful crust. The edges of the cuts can crisp up beautifully, forming desirable features like the "ear" – a thin, crispy flap of crust that peels back from the main cut.
Aesthetic Reasons:
- Artistic Expression: Sourdough scoring patterns are a baker's canvas. They allow for incredible creativity and personalization. From simple slashes to intricate designs, the scoring transforms a plain loaf into a work of art. This is where the baker's unique signature comes into play, making each loaf truly one-of-a-kind.
- Professional Appearance: A well-scored loaf looks professional and inviting. It signals to the eater that care and skill went into its creation. Beautiful scoring can elevate the perceived quality of the bread, making it more appealing for serving or gifting.
- Identifying Loaves: For bakers making multiple types of sourdough, different scoring patterns can serve as a simple way to identify different recipes or flours used.
Ultimately, scoring is about control and intention. It's about understanding the dough and guiding its natural tendencies to produce a loaf that is both functionally superior and visually stunning. This easy sourdough bread recipe—trusted by beginner bakers for over a decade—shows you how, step by step, to achieve both.
Essential Tools for Precision Sourdough Scoring
While the skill is paramount, having the right tools can significantly ease the process of creating beautiful sourdough scoring patterns. You don't need a stand mixer or a bread machine for this; just a few key items will suffice.
- Lame (Pronounced "Lahm"): This is the most crucial tool. A lame is essentially a handle that holds a razor blade. There are two main types:
- Straight Lame: Holds the blade straight, ideal for deep, straight cuts and intricate designs.
- Curved Lame: Holds the blade with a slight curve, perfect for creating the classic "ear" as the curved blade helps lift the flap of dough. Many lames are designed to allow you to switch between straight and curved positions.
- Sharp Razor Blades: Always use new, sharp razor blades. Dull blades will tear the dough, leading to messy scores and poor oven spring. Double-edged razor blades are commonly used and can be flipped for extended use.
- Dough Whisk (Optional but Helpful): While not directly for scoring, a good dough whisk helps incorporate ingredients thoroughly, leading to a more consistent dough structure that is easier to score.
- Rice Flour or Semolina (for dusting): Dusting your dough lightly with rice flour or semolina before scoring helps prevent the blade from sticking, especially with higher hydration doughs. It also adds a beautiful contrast to the baked crust.
- Pastry Brush (Optional): Useful for dusting off excess flour after scoring, or for applying a light water mist to the dough surface for certain effects.
Investing in a good quality lame and fresh blades is perhaps the single best thing you can do to improve your sourdough scoring. Remember, the goal is to make quick, confident, and clean cuts.
Understanding the Basics of Sourdough Scoring Patterns
Before diving into specific sourdough scoring patterns, it's essential to grasp the fundamental principles that govern successful scoring: depth, angle, and blade sharpness. These elements dictate how your dough will expand and what the final baked loaf will look like.
The Importance of Depth and Angle
- Depth: The depth of your cut is critical.
- Too shallow: If your cuts are too shallow, they won't provide enough release for the internal pressure, and the dough might still burst haphazardly elsewhere.
- Too deep: Cuts that are too deep can cause the dough to collapse, especially if it's over-proofed, leading to a flat loaf. For most sourdough loaves, a depth of about 1/4 to 1/2 inch (0.6 to 1.2 cm) is ideal for primary cuts. Decorative cuts can be shallower.
- Angle: The angle at which you hold your lame relative to the dough surface is equally important, particularly for creating an "ear."
- For an "Ear": Hold the blade at a shallow angle, almost parallel to the dough surface (around 15-30 degrees). This allows the top flap of dough to lift and crisp up, forming the characteristic "ear."
- For a Controlled Bloom/Even Expansion: For cuts intended to open up broadly and evenly, hold the blade more perpendicularly (around 60-90 degrees). This encourages the dough to open up symmetrically.
The Role of Blade Sharpness
As mentioned earlier, blade sharpness cannot be overstated. A dull blade will drag and tear the dough, resulting in ragged, uneven cuts. This not only looks messy but also hinders proper oven spring. A clean cut from a sharp blade allows the dough to expand smoothly and predictably. Think of it like cutting fabric with sharp scissors versus dull ones – the difference in the result is dramatic. Always use a fresh, sharp razor blade for each scoring session, or at least flip your double-edged blade to a fresh side.
In addition to depth, angle, and sharpness, confidence and speed are key. Make your cuts swiftly and decisively. Hesitation can lead to jagged lines and a less effective score. Practice on scrap dough or even a soft fruit like an orange if you're nervous, but nothing beats the feel of actual sourdough. Remember, sourdough is essentially a natural yeast, and it responds best to confident handling.
Popular Sourdough Scoring Patterns for Beginners
For those just starting with homemade sourdough bread, mastering a few basic sourdough scoring patterns is the perfect entry point. These patterns are forgiving, effective, and will help you build confidence before moving on to more intricate designs. Remember, all you need is a few ingredients, some time, and patience.
The Classic Single Slash (The "Ear")
This is arguably the most iconic sourdough scoring pattern and often the first one bakers aim to perfect. It's designed to create that beautiful, crispy "ear" that is a hallmark of artisan sourdough. This single, long cut allows for maximum controlled expansion.
- How to Execute:
- Dust your dough lightly with rice flour or semolina.
- Position your lame with a curved blade (or a straight blade held at a shallow angle) at one end of the loaf.
- Make one swift, continuous cut along the length of the loaf, slightly off-center. The cut should be about 1/4 to 1/2 inch deep.
- Maintain a shallow angle (15-30 degrees) to the dough surface throughout the cut. This is crucial for creating the "lip" that will become the ear.
- Tips for Success:
- Ensure your dough is well-proofed but not over-proofed. A slightly under-proofed dough might not open as much, while an over-proofed dough might collapse.
- Be confident and quick with your cut. Hesitation leads to tearing.
- A light dusting of flour helps the blade glide smoothly.
- Why it Works: The single, angled cut provides a large, unobstructed path for the dough to expand, pushing up the flap of dough to form the ear as it bakes.
The Criss-Cross or Grid Score
This pattern is simple, effective, and results in a rustic, beautifully textured crust. It's excellent for beginners because it doesn't require a precise angle like the ear does, focusing more on even expansion.
- How to Execute:
- Dust your dough.
- Hold your lame relatively perpendicularly (around 60-90 degrees) to the dough surface.
- Make a series of parallel cuts across the top of the loaf, about 1/4 to 1/2 inch deep and spaced about 1 inch apart.
- Rotate the loaf 90 degrees.
- Make another series of parallel cuts perpendicular to the first set, creating a grid pattern.
- Tips for Success:
- Ensure consistent depth and spacing for an even bloom.
- This pattern works well for both round (boule) and oval (batard) loaves.
- It's very forgiving and reliably produces a good-looking loaf.
- Why it Works: The multiple cuts provide numerous points of controlled expansion, leading to a beautifully textured, evenly opened crust. This is a great pattern to start with to understand how sourdough bread is made through fermentation, using the yeast naturally present in flour, and how it impacts the final product.
Start with these patterns, practice, and observe how your dough responds. Each loaf will teach you something new about the intricate dance between fermentation, proofing, and the final flourish of sourdough scoring patterns.
Advanced Sourdough Scoring Patterns: Artistry in Bread
Once you've mastered the basics, the world of advanced sourdough scoring patterns opens up, allowing for true artistic expression. These patterns often combine functional cuts with decorative elements, transforming a simple loaf into a stunning centerpiece. Remember, sourdough refers both to bread, and to the starter used to make it, and the quality of both will shine through in intricate scoring.
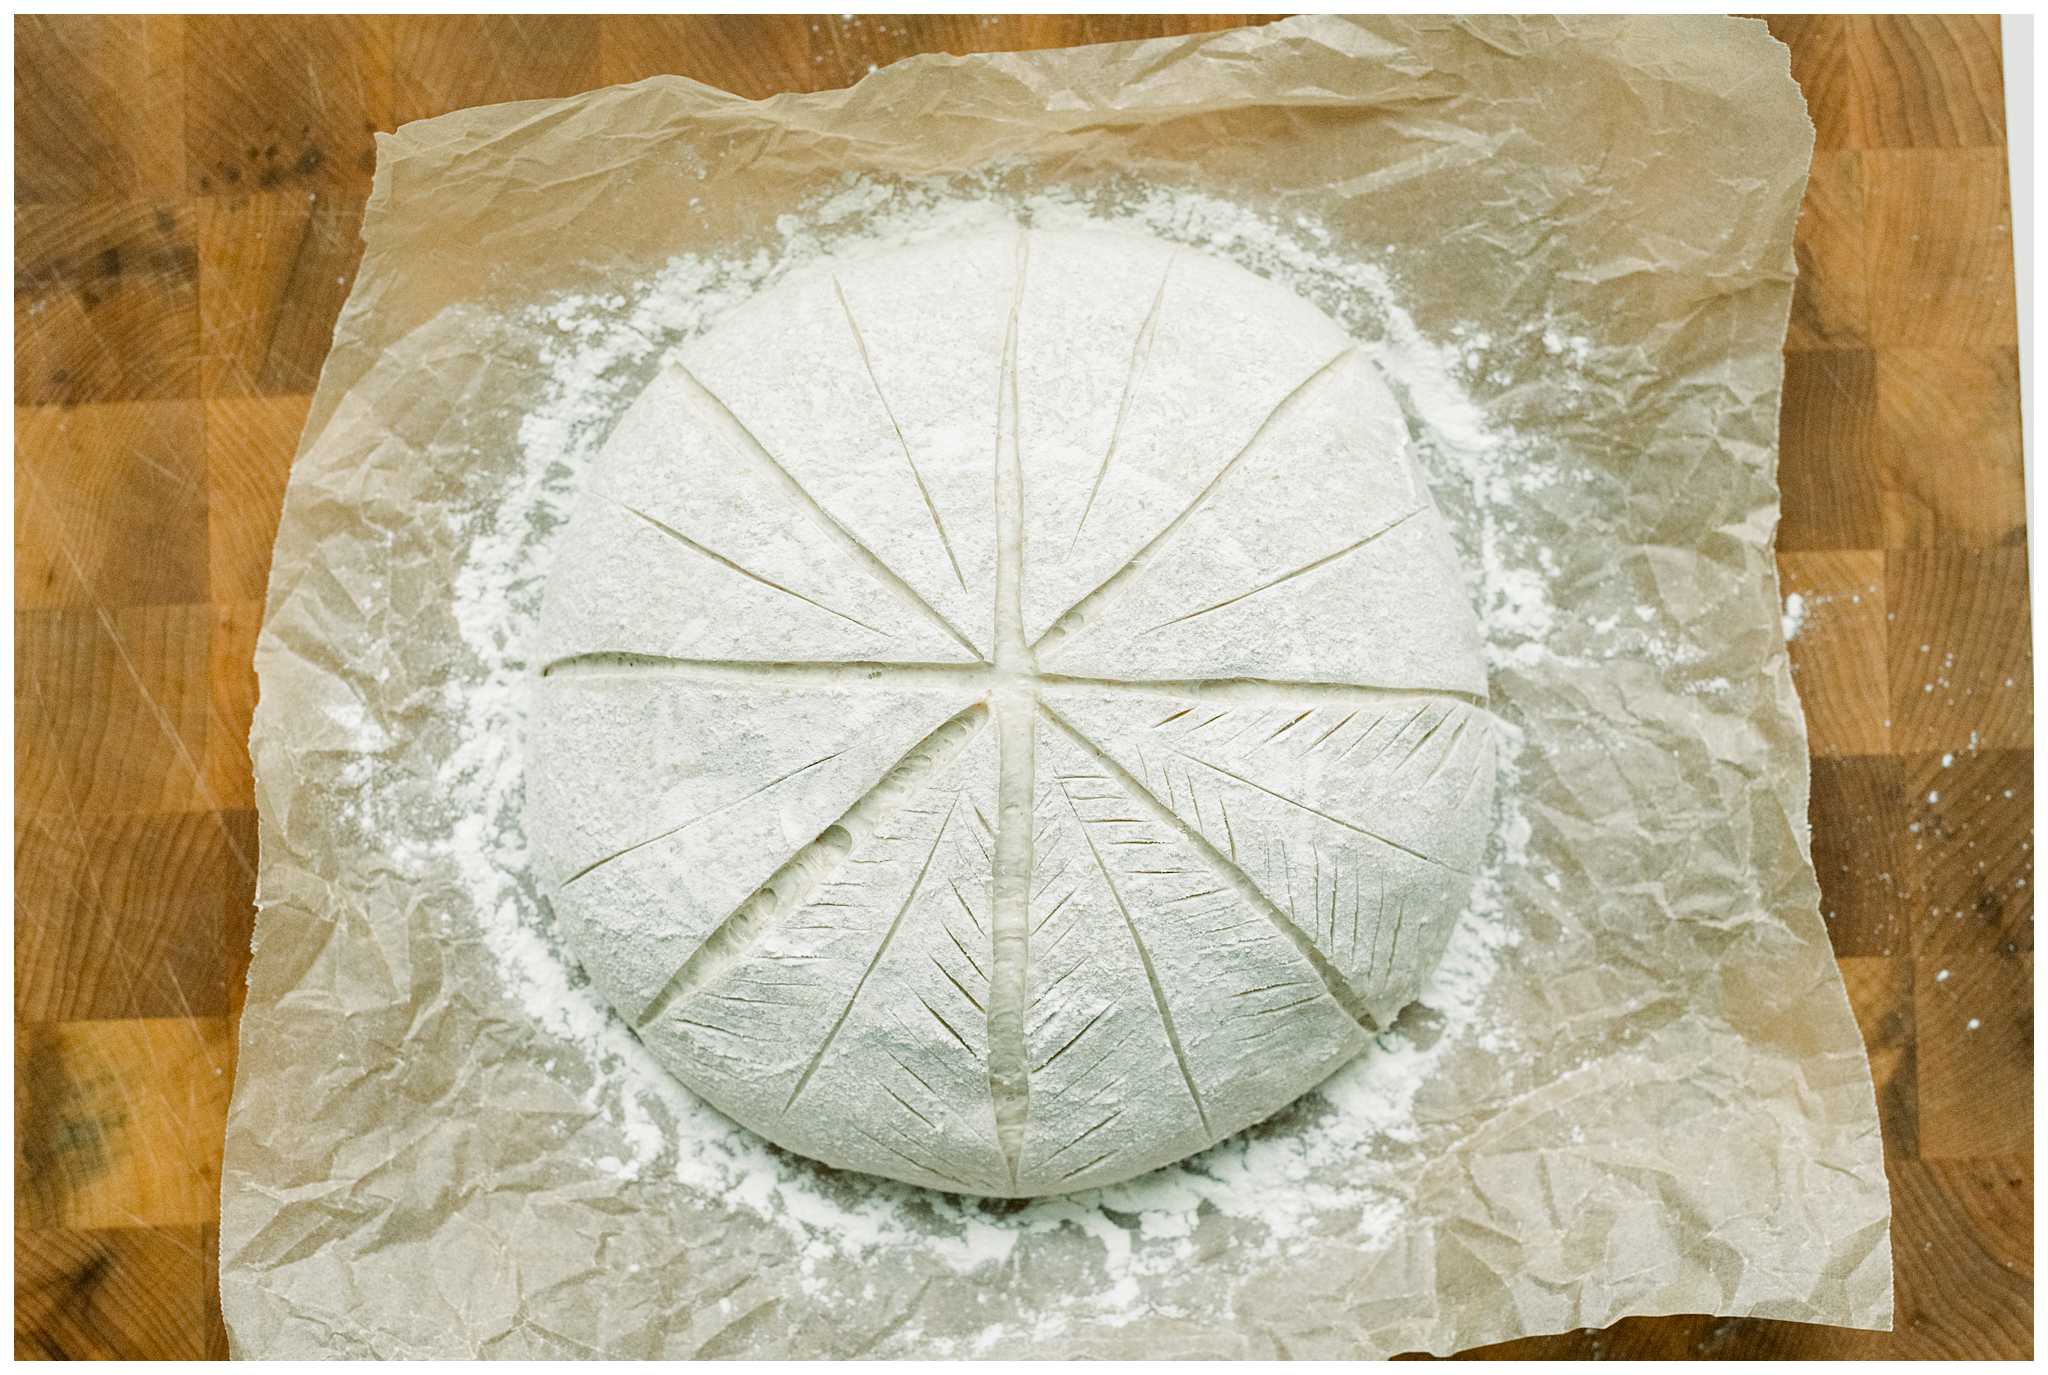
- Wheat Stalk/Leaf Pattern: This elegant design mimics a wheat stalk or a leaf. It typically involves a central, slightly angled cut (similar to an ear cut, but often shallower) with smaller, curved cuts branching off from it.
- Execution: Make a central, slightly curved score. Then, on either side, make smaller, diagonal, curved cuts that meet the central score, resembling veins on a leaf. The angle of these smaller cuts can vary to create different effects.
- Challenge: Requires precision in spacing and consistent curvature of the smaller cuts.
- Floral/Spiral Patterns: These intricate designs create a blooming effect or a mesmerizing spiral. They often involve a central point from which multiple curved cuts radiate outwards, or a continuous spiral cut.
- Execution: For a floral pattern, make several curved cuts originating from a central point, like petals. For a spiral, begin at the center and make a continuous, gradually widening spiral cut to the edge.
- Challenge: Maintaining consistent spacing and depth for symmetrical expansion. A very well-proofed dough is crucial for these designs to open beautifully.
- Geometric Patterns: Beyond the simple grid, bakers can create complex geometric designs like hexagons, diamonds, or overlapping circles.
- Execution: Requires careful planning and often a ruler or template for precise measurements. Cuts are usually straight and deep for defined lines.
- Challenge: Accuracy and consistency are key to achieving sharp, clean geometric shapes.
- Stenciling and Layered Scoring: This involves dusting the dough with cocoa powder, activated charcoal, or rice flour through a stencil before scoring, or combining shallow decorative cuts with deeper structural cuts.
- Execution: Apply a stencil and dust before scoring. Then, make your primary functional scores. You can also make very shallow, decorative cuts (e.g., small crosses, dots) that don't contribute to oven spring but add visual texture.
- Challenge: Ensuring the stenciled design remains intact during scoring and baking.
For advanced sourdough scoring patterns, the dough's condition is even more critical. A perfectly proofed dough with good surface tension will hold intricate cuts better and open more predictably. It's also said to be more nutritious than regular bread, making the effort worthwhile. Experiment with different blade angles and depths within a single pattern to create contrasting textures and visual interest. This is where your understanding of the dough, developed through making delicious sourdough at home, truly comes into play.
Troubleshooting Common Sourdough Scoring Issues
Even experienced bakers encounter challenges with sourdough scoring. Understanding common issues and their causes can help you refine your technique and achieve consistently beautiful loaves. Remember, patience is key, as sourdough captures those natural yeasts and takes time to develop.
- Issue: Cuts are tearing or dragging, not clean.
- Cause: Dull blade, dough too sticky, or hesitant cuts.
- Solution: Always use a fresh, sharp razor blade. Lightly dust the dough with rice flour or semolina before scoring. Make quick, confident, and decisive cuts.
- Issue: Loaf bursts haphazardly despite scoring.
- Cause: Cuts are too shallow, dough is under-proofed, or insufficient steam in the oven.
- Solution: Ensure cuts are deep enough (1/4 to 1/2 inch for primary cuts). Check your proofing; under-proofed dough has too much spring and will burst where it's weakest. Ensure adequate steam during the initial bake (e.g., using a Dutch oven or steam pan).
- Issue: Cuts don't open much, or the "ear" is small/non-existent.
- Cause: Dough is over-proofed, cuts are too deep, not enough oven spring, or wrong angle for the ear.
- Solution: Over-proofed dough has exhausted its leavening power and won't have much oven spring. Adjust your proofing time. Ensure your ear cut is at a shallow angle (15-30 degrees). Ensure your oven is preheated sufficiently to create strong oven spring.
- Issue: Dough collapses or spreads after scoring.
- Cause: Dough is severely over-proofed, dough is too wet/weak, or cuts are too deep.
- Solution: This often indicates over-proofing. Reduce your final proofing time. Ensure your dough has sufficient strength (proper gluten development during folds). Avoid excessively deep cuts, especially on weaker doughs.
- Issue: Scoring looks messy or uneven.
- Cause: Lack of practice, inconsistent pressure, or poor dough handling.
- Solution: Practice makes perfect. Focus on consistent pressure and angle. Ensure your dough is well-shaped and has good surface tension before scoring. Dusting can also help.
Remember, every batch of sourdough is unique due to environmental factors and the starter's activity. Most sourdough recipes call for 1 to 2 cups of starter, and the quality of this starter is paramount. Pay attention to your dough's texture and behavior. With observation and practice, you'll learn to anticipate how your specific dough will respond to different sourdough scoring patterns.
Elevating Your Sourdough Scoring Game
Beyond basic troubleshooting, there are several advanced tips and considerations that can take your sourdough scoring patterns from good to truly exceptional. These techniques often involve a deeper understanding of dough mechanics and a willingness to experiment.
- Dough Temperature and Hydration:
- Cooler Dough: Slightly cooler dough (e.g., dough that has been cold-proofed in the refrigerator overnight) tends to be firmer and easier to score cleanly. The cold also slows down fermentation, giving you more time to score.
- Hydration Levels: Higher hydration doughs (wetter doughs) are notoriously more challenging to score as they are stickier and softer. Dusting with rice flour becomes even more crucial here. As a beginner, start with lower hydration doughs (around 70-75%) before tackling very wet ones.
- Surface Tension is Key: A well-shaped loaf with good surface tension is easier to score. Ensure your final shaping creates a taut "skin" on the dough. This skin will hold the score better and allow for a cleaner cut.
- Confidence and Speed: As reiterated, quick, confident cuts are always better than hesitant, slow ones. Think of it as a single, fluid motion rather than a tentative drag.
- Experiment with Blade Angles: Don't be afraid to vary the angle of your lame within a single pattern. For instance, a main ear cut at a shallow angle, combined with decorative cuts at a steeper angle, can create beautiful contrast and depth.
- Consider Your Baking Vessel: If baking in a Dutch oven or on a baking stone, the heat transfer will affect how your scores open. A Dutch oven traps steam, promoting excellent oven spring and making scores open beautifully.
- Practice on Discard Dough: If you have sourdough starter discard (the portion you remove before feeding), you can use it to practice scoring. While it won't rise like active dough, it will give you a feel for the blade and the motion.
- Learn from Others: Watch videos of experienced bakers scoring. Pay attention to their grip, angle, and speed. There's a wealth of knowledge available from the baking community. This easy and comprehensive guide to a beginner's sourdough bread to make delicious sourdough at home is just the start.
- Record Your Bakes: Keep a baking journal. Note down your dough hydration, proofing times, scoring patterns, and the results. This will help you identify what works best for your starter and environment.
By focusing on these details, you'll not only improve your sourdough scoring patterns but also gain a deeper intuitive understanding of your dough. This journey is about learning and adapting, much like the natural fermentation process itself. It has also been discovered that sourdough bread doesn’t spike your blood sugar as much, adding another layer of benefit to your baking journey.
Conclusion: The Signature of a Sourdough Baker
Sourdough scoring patterns are where the science of baking meets the art of creation. From the initial fermentation by naturally occurring yeast and lactobacillus bacteria to the final flourish of the lame, every step contributes to the masterpiece that is a homemade sourdough loaf. We've explored why these cuts are essential for controlled oven spring and a desirable crumb, the simple yet crucial tools involved, and the fundamental principles of depth and angle that dictate their success.
Whether you're starting with the rustic elegance of a single ear or venturing into the intricate world of floral designs, remember that practice is your best teacher. Each loaf presents an opportunity to refine your technique, understand your dough better, and express your unique baking signature. Sourdough is a type of bread that uses the fermentation by naturally occurring yeast and lactobacillus bacteria to raise the dough, and your scoring helps it achieve its full potential.
So, grab your lame, embrace the challenge, and let your creativity flow. The satisfaction of pulling a beautifully scored, perfectly risen loaf from the oven is unparalleled. What are your favorite sourdough scoring patterns? Share your experiences and tips in the comments below, or tell us about your journey in mastering the art of the perfect sourdough ear!
- Suncoast Community Health Center
- Utica Obits
- Cork And Batter
- Marshfield Obituaries
- Do Sharks Have Bones

Sourdough scoring patterns – Artofit

Sourdough scoring patterns – Artofit
Christmas Sourdough Scoring Patterns - Real and Rustic
