Master The Art Of Soldering Copper Pipe: Your Ultimate DIY Guide
Table of Contents
- Why Soldering Copper Pipe Remains a Plumbing Staple
- Essential Tools and Materials for Soldering Copper Pipe
- Preparing Your Copper Pipes for a Perfect Joint
- The Art of Heating and Solder Application
- Ensuring Joint Integrity: The Post-Solder Check
- Common Pitfalls and How to Avoid Them When Soldering Copper Pipe
- When to Call a Professional: Knowing Your Limits
- Maintaining Your Soldering Equipment for Longevity
Why Soldering Copper Pipe Remains a Plumbing Staple
Copper has been a preferred material for plumbing systems for centuries, and for good reason. It's durable, corrosion-resistant, recyclable, and inhibits bacterial growth, making it an excellent choice for potable water lines. While newer alternatives like PEX tubing have gained popularity for their flexibility and ease of installation, soldering copper pipe still holds a crucial place in plumbing. For rigid, long-lasting, and aesthetically pleasing installations, especially in exposed areas or where high pressure and temperature resistance are paramount, copper remains king. The strength of a properly soldered joint is unparalleled, capable of withstanding significant pressure fluctuations and temperature changes without degradation. This reliability is why many professional plumbers continue to rely on it for critical applications, ensuring a secure and leak-free system for decades.Essential Tools and Materials for Soldering Copper Pipe
Before you even think about heating anything, gathering the right tools and materials is paramount. Just as a chef needs the right ingredients and utensils, a successful plumbing job involving soldering copper pipe demands specific, high-quality equipment. Skimping here can lead to frustrating failures, wasted materials, and potentially costly leaks down the line.The Right Soldering Iron or Torch
The primary tool for heating your copper pipe is a heat source. For plumbing, this almost exclusively means a propane or MAPP gas torch, not a typical electronics soldering iron. The heat requirements for copper plumbing are vastly different from delicate electronic components. **I noticed using a 25-watt iron while replacing my electronics on my Strat that it was very difficult to get a proper hot joint.** This experience perfectly illustrates why a low-wattage iron is utterly inadequate for copper pipe. Copper is an excellent conductor of heat, meaning it dissipates heat very quickly. To overcome this, you need significant, sustained heat. **It is best to use a powerful enough soldering iron/gun to make quick work of it.** A small propane torch with a pencil flame tip is often sufficient for ½-inch and ¾-inch copper pipes. For larger diameters (1-inch and above) or in colder environments, a MAPP gas torch provides a hotter flame and heats the pipe more quickly. The key is to get the pipe to the correct temperature efficiently. **It took what I felt is an excessively long time to heat it** with an underpowered tool, which not only wastes time but also increases the risk of overheating the surrounding areas or burning the flux before the pipe reaches soldering temperature. The goal is rapid, even heating.Solder, Flux, and Abrasives
* **Solder:** For potable water systems, you *must* use lead-free solder. Modern lead-free solders are typically tin-based, often with small amounts of copper, silver, or bismuth to improve flow and strength. Look for solder specifically labeled for plumbing or potable water. **Using a solder strip will 9 times out of 10** make the process more convenient, as these often come pre-fluxed or are designed for easy application around the joint. However, traditional wire solder is also perfectly effective. * **Flux:** Flux is a chemical cleaning agent that prepares the copper surfaces for soldering. It removes oxidation and prevents further oxidation during heating, allowing the molten solder to flow smoothly and bond atomically with the copper. Without flux, the solder will simply bead up and not adhere properly. Use a water-soluble, non-corrosive flux designed for plumbing. * **Abrasives:** Before applying flux, the copper surfaces must be meticulously clean. This means removing any oxidation, dirt, or grease. Essential abrasives include: * **Wire brush (fitting brush):** Used to clean the inside of copper fittings. * **Sandcloth or emery cloth:** Used to clean the outside of copper pipes. A dedicated pipe cleaning tool is also highly recommended for consistent results.Safety Gear: Non-Negotiable Protection
Safety is paramount when working with open flames and molten metal. **If you've ever had the misfortune of grabbing a soldering iron incorrectly (not paying attention or something) or having it hit something accidentally, you realize why avoiding** burns and other injuries is critical. The principles of safety for soldering copper pipe are even more stringent due to the higher heat involved. * **Fire Extinguisher:** Always have a multi-purpose (ABC) fire extinguisher readily accessible. * **Heat Shield/Fire Blanket:** Use a non-combustible heat shield or fire blanket to protect nearby walls, wood studs, or other flammable materials from the torch flame. This is especially crucial in confined spaces. * **Safety Glasses/Goggles:** Protect your eyes from sparks, molten solder, and flux fumes. * **Gloves:** Heat-resistant gloves can protect your hands from accidental contact with hot pipes or tools. * **Ventilation:** Ensure adequate ventilation to disperse fumes from the flux and solder. **I need to solder speaker cable to my speaker, will this set off a smoke alarm?** While speaker cable soldering produces less smoke than plumbing, soldering copper pipe *can* produce significant smoke and fumes, especially if the flux burns. It is highly advisable to open windows and doors, or even use a fan, to prevent smoke alarms from triggering and to ensure you're not inhaling harmful fumes. **I really would rather not be the cause of the fire department coming down and get the wardens in my** neighborhood involved due to a preventable smoke alarm incident or, worse, a fire. Always be mindful of your surroundings. * **Water:** Keep a bucket of water or a spray bottle handy for cooling down hot joints or extinguishing small embers.Preparing Your Copper Pipes for a Perfect Joint
The secret to a strong, leak-proof soldered joint lies in meticulous preparation. This stage is arguably more important than the actual soldering itself. A poor preparation will inevitably lead to a failed joint, regardless of how expertly you apply heat and solder. 1. **Cut the Pipe:** Use a pipe cutter to make a clean, square cut. A hacksaw can also be used, but it's harder to get a perfectly straight cut, which is essential for a good fit. 2. **Ream the Pipe:** After cutting, the inside edge of the pipe will have a burr. Use a reaming tool (often integrated into pipe cutters) to remove this burr. A burr restricts water flow and can cause turbulence, leading to noise and erosion over time. 3. **Clean the Pipe and Fitting:** This is the most critical step. Both the outside of the pipe end and the inside of the fitting socket must be thoroughly cleaned down to bare, shiny copper. Use sandcloth or emery cloth for the pipe and a wire fitting brush for the inside of the fitting. Rotate the cleaning tool to ensure uniform abrasion. Any oxidation, dirt, or oil will prevent the solder from bonding. 4. **Apply Flux:** Once cleaned, immediately apply a thin, even layer of flux to both the outside of the pipe end and the inside of the fitting socket. Don't overdo it; too much flux can create residue that hinders solder flow. The flux acts as a temporary protective layer, preventing re-oxidation before heating, and helps the solder flow into the joint. 5. **Assemble the Joint:** Push the pipe firmly into the fitting, rotating it slightly to spread the flux evenly. The pipe should seat fully into the fitting's stop.The Art of Heating and Solder Application
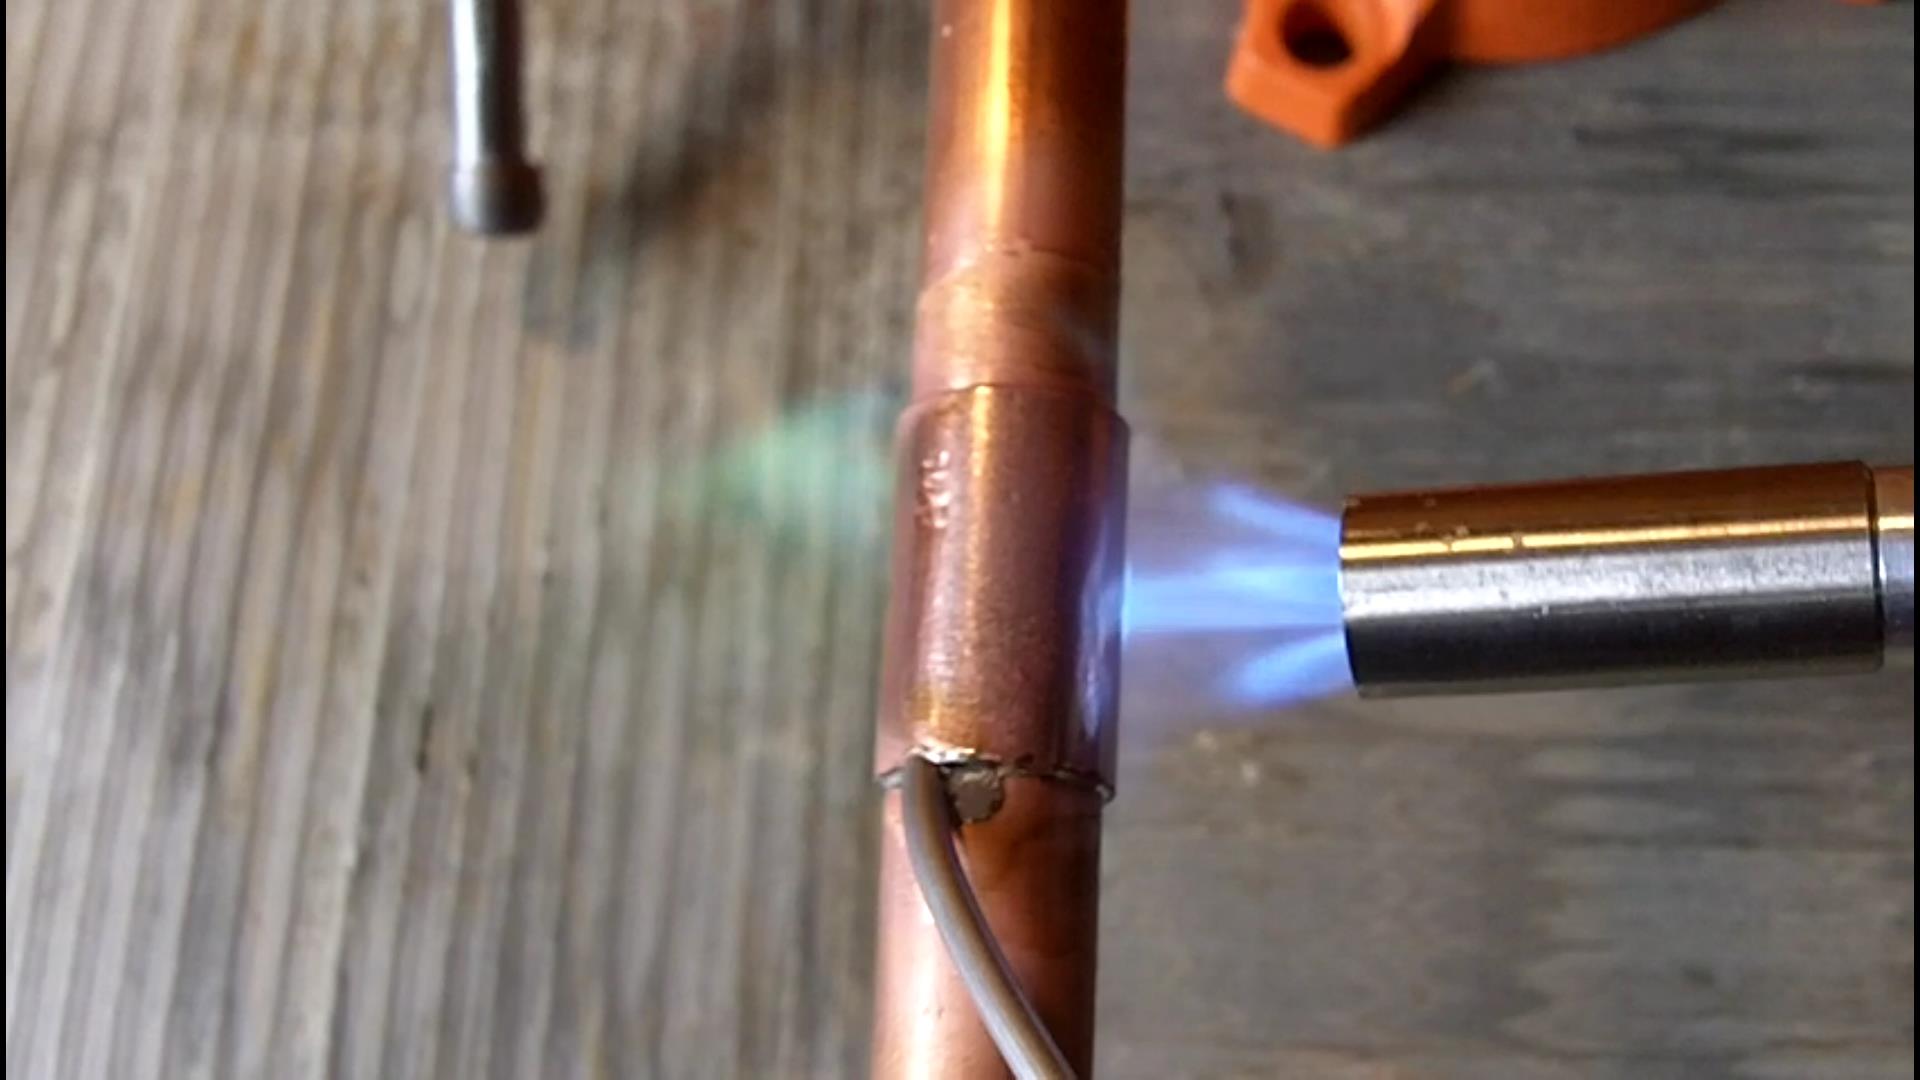
This is where the magic happens, but it requires precision and understanding of how heat interacts with copper and solder. **The trick to soldering is to heat the metal of the connection then add solder and it will flow around the connection and bond the metals atomically.** This is the fundamental principle. You're not melting the solder with the torch flame; you're heating the copper to a temperature where it can melt the solder. 1. **Apply Heat Evenly:** Direct the torch flame to the fitting, not the pipe, focusing on the thickest part of the fitting where the pipe enters. Move the flame around the circumference of the fitting to ensure even heating. Keep the flame moving to avoid scorching the flux or overheating one spot. 2. **Test for Temperature:** Periodically touch the solder wire to the joint, opposite where the flame is directed. When the copper reaches the correct temperature (typically around 400-500°F or 200-260°C for lead-free solder), the solder will instantly melt and be drawn into the joint by capillary action. Do not apply the flame directly to the solder. 3. **Feed the Solder:** Once the copper is hot enough, remove the flame and immediately touch the solder to the joint. The solder should flow quickly and smoothly around the entire circumference, forming a bright, continuous ring. Feed enough solder to fill the gap completely. A good joint will show a complete ring of solder around the fitting. 4. **Avoid Overheating:** **The longer you apply heat, the more likely you are to do damage.** Overheating can burn off the flux, preventing solder flow, or even weaken the copper itself. It can also cause issues with nearby components. For instance, **how easy is it to burn out a pot?** While this refers to an electronic potentiometer, the principle of heat damage applies: excessive, prolonged heat can damage sensitive components or weaken materials. With copper pipes, overheating can cause the flux to carbonize, leaving a black residue that solder won't adhere to, or it can anneal the copper, making it softer and weaker. 5. **Cooling:** Once the solder has flowed, remove the torch. Allow the joint to cool naturally without disturbing it. Do not quench it with water immediately, as this can weaken the joint. Once it's cool enough to touch, you can use a damp rag to wipe away any excess flux residue.Ensuring Joint Integrity: The Post-Solder Check
After the joint has cooled, a crucial step is to inspect it for integrity. A visual inspection is the first line of defense. Look for a continuous, shiny ring of solder around the entire circumference of the joint. There should be no gaps, pinholes, or dull, lumpy areas (which indicate a "cold joint"). Beyond visual inspection, a physical check is essential. **Gently tug on your solder connections to make sure they're solid.** A properly soldered joint will feel incredibly strong and rigid. If there's any wobble, movement, or a "giving" sensation, the joint is compromised and needs to be re-soldered. This might involve reheating the joint, adding more flux, and applying more solder, or in severe cases, cutting out the joint and starting over. Remember, **if you're just careful with your soldering, copy the connections very carefully with what was already there and then gently tug on your solder connections to make sure they're solid.** While this advice originally pertains to electronics, the principle of careful replication and rigorous testing applies directly to ensuring robust plumbing connections. Finally, after all joints in a section are cooled and inspected, perform a pressure test. If it's a water line, turn on the water supply slowly and check for any leaks. Even a tiny drip indicates a faulty joint that needs immediate attention.Common Pitfalls and How to Avoid Them When Soldering Copper Pipe
Even with the right tools and technique, issues can arise. Understanding common problems and their solutions is key to successfully soldering copper pipe. * **Cold Joints:** This is perhaps the most common issue. A cold joint appears dull, lumpy, and often has visible gaps. It occurs when the pipe or fitting wasn't heated sufficiently, preventing the solder from flowing properly and bonding atomically. * *Solution:* Reheat the joint, ensuring even heat distribution. Add a little more flux and touch the solder to the joint again. If the solder doesn't flow smoothly, you may need to clean and re-flux, or even start over if the flux has burned. * **Burned Flux:** If the flux turns black and crusty, it means it's been overheated. Burned flux loses its cleaning properties and prevents solder flow. * *Solution:* Let the joint cool, clean off the burned flux with a wire brush or sandcloth, reapply fresh flux, and reheat more carefully. * **Solder Not Flowing Around Entire Joint:** This often indicates uneven heating. One side of the joint might be hot enough, but the other isn't. * *Solution:* Ensure you're moving the torch flame around the entire circumference of the fitting to achieve uniform temperature. * **Water in the Pipe:** Even a small amount of water or moisture inside the pipe will turn to steam when heated, preventing the solder from flowing into the joint. * *Solution:* Ensure the pipe is completely drained before soldering. If you can't drain it fully, try stuffing a piece of bread (which will dissolve later) or a specialized water-stop plug into the pipe to temporarily block the water. * **Too Much Solder:** While it might seem like more solder equals a stronger joint, excessive solder can create unsightly drips and doesn't necessarily improve strength. It also wastes material. * *Solution:* Learn to "read" the joint. Once a complete, shiny ring of solder appears, stop feeding. The capillary action will draw in just enough.When to Call a Professional: Knowing Your Limits
While soldering copper pipe is a highly achievable DIY skill, there are times when it's best to call in a licensed professional. This is particularly true for projects that fall under the YMYL (Your Money or Your Life) category, where mistakes can have serious financial or safety consequences. * **Gas Lines:** Never attempt to solder gas lines unless you are a certified and licensed professional. Gas leaks are incredibly dangerous and can lead to explosions or carbon monoxide poisoning. * **Complex Systems:** If you're dealing with intricate plumbing layouts, multi-story systems, or connections to major appliances, a professional can ensure proper flow, pressure, and adherence to local building codes. * **Main Water Lines:** Any work on your home's main water line, especially before the shut-off valve, should ideally be handled by an expert to avoid major water damage or issues with municipal supply. * **Lack of Confidence:** If you feel unsure or uncomfortable at any point, it's always safer and often more cost-effective in the long run to hire a professional. Their expertise can prevent costly mistakes and provide peace of mind. Remember, a single leak can cause thousands of dollars in damage.Maintaining Your Soldering Equipment for Longevity
Proper care of your soldering tools ensures they remain effective and safe for years to come. * **Torch Maintenance:** Regularly check your torch for leaks, especially around the connections to the gas cylinder. Keep the nozzle clean. Store gas cylinders upright in a cool, well-ventilated area away from direct sunlight or heat sources. * **Cleaning Tools:** Keep your wire brushes and sandcloth clean. Replace them when they become worn or clogged with debris. * **Flux Storage:** Store flux in a cool, dry place, keeping the lid tightly sealed to prevent it from drying out or becoming contaminated. * **Safety Gear:** Inspect your safety glasses, gloves, and fire blanket regularly for damage. Replace them if they show signs of wear and tear. By maintaining your equipment, you not only extend its lifespan but also ensure that your next copper pipe soldering project will be as smooth and successful as possible.
Conclusion
Mastering the art of soldering copper pipe is a valuable skill that empowers you to tackle a wide range of plumbing repairs and installations with confidence. From selecting the right powerful torch to meticulously cleaning your pipe and fittings, every step contributes to a strong, leak-proof joint. Remember the core principle: heat the copper, not the solder, and ensure even heat distribution for a perfect flow. Always prioritize safety, using appropriate gear and being mindful of your surroundings to prevent accidents. With practice, patience, and attention to detail, you'll soon be creating professional-grade plumbing connections that stand the test of time. Don't be discouraged by initial challenges; every experienced plumber started somewhere. So, gather your tools, review these steps, and take on your next plumbing project with newfound expertise. Have you tried soldering copper pipe before? What were your biggest challenges or successes? Share your experiences and tips in the comments below! If you found this guide helpful, consider sharing it with fellow DIY enthusiasts, and explore our other articles for more home improvement insights.- Do Sharks Have Bones
- Coconut Creek Hyundai
- Beasley Funeral Home
- Cleaning Authority
- Super Mario 3d All Stars

Soldering Copper Pipe Problems That You Can Easily Avoid!
How to Guide: Soldering Copper Pipe - See Jane Drill

Soldering Copper Pipe Is Also Called Sweating Pipe: Learn How
