Crafting The Perfect Red Velvet Cupcake Recipe: A Baker's Guide
Table of Contents
- The Allure of Red Velvet: More Than Just a Color
- Essential Ingredients for Your Red Velvet Masterpiece
- The Science Behind the Red: Achieving That Iconic Hue
- Step-by-Step Guide to Baking Flawless Red Velvet Cupcakes
- The Cream Cheese Frosting: A Match Made in Heaven
- Common Pitfalls and How to Avoid Them
- Elevating Your Red Velvet Experience: Creative Variations & Serving Suggestions
- Storage and Shelf Life: Keeping Your Cupcakes Fresh
The Allure of Red Velvet: More Than Just a Color
The red velvet cupcake holds a special place in the dessert world, a testament to its enduring appeal. Its origins are somewhat debated, with tales ranging from the Waldorf-Astoria Hotel in New York to the Adams Extract Company in Texas, which popularized the use of red food coloring during the Great Depression. What's clear, however, is its evolution from a luxurious cake to the universally adored cupcake form we know today. Beyond its striking visual appeal, the true magic of red velvet lies in its unique flavor profile. It's not just a chocolate cake dyed red; it possesses a subtle cocoa tang, a hint of vanilla, and a moist, tender crumb that sets it apart. The traditional recipe calls for a delicate balance of acidic ingredients like buttermilk and vinegar, which react with baking soda to create that signature tender texture and contribute to the slight tanginess that complements the cocoa so perfectly. This intricate balance is what makes a truly exceptional red velvet cupcake recipe stand out from a mere imitation. It’s a flavor that evokes warmth, comfort, and a touch of elegance, making it perfect for any occasion, from casual gatherings to celebratory events.Essential Ingredients for Your Red Velvet Masterpiece
To craft the ultimate red velvet cupcake recipe, understanding the role of each ingredient is crucial. Think of them as the star players in a championship team, much like the legendary Red Sox starting pitchers who graced the mound for the '04, '07, '13, or '18 teams – Lester, Buchholz, Matsuzaka, and E-Rod – each bringing their unique strength to the game. Similarly, every ingredient contributes to the overall success. * **All-Purpose Flour:** The structural backbone of your cupcake. Sifting it is key to a light, airy texture. * **Unsweetened Cocoa Powder (Natural, not Dutch-processed):** This is vital. Natural cocoa powder is acidic and reacts with the baking soda and buttermilk to create the red hue (when combined with red food coloring) and the distinctive flavor. Dutch-processed cocoa is alkalized and won't give the same results. * **Baking Soda:** The primary leavening agent. It reacts with the acids in buttermilk, vinegar, and natural cocoa powder to produce carbon dioxide, creating lift and tenderness. * **Salt:** Enhances all the flavors, balancing the sweetness and bringing out the depth of the cocoa. * **Granulated Sugar:** Provides sweetness and moisture, contributing to the tender crumb. * **Unsalted Butter:** Adds richness, flavor, and contributes to the tender texture. Ensure it's at room temperature for proper creaming. * **Large Eggs:** Bind the ingredients, add richness, and contribute to the structure. Also, ensure they are at room temperature. * **Buttermilk:** A cornerstone of the red velvet flavor and texture. Its acidity reacts with the baking soda, and its fat content contributes to moisture. If you don't have buttermilk, you can make a substitute by adding 1 tablespoon of white vinegar or lemon juice to a cup of milk and letting it sit for 5-10 minutes until it slightly curdles. * **White Vinegar:** Another acidic component that reacts with baking soda for leavening and helps activate the red color in the cocoa. Don't skip it! * **Vanilla Extract:** A crucial flavor enhancer that complements the cocoa and adds depth. Use good quality pure vanilla extract. * **Red Food Coloring:** This is where the iconic "red" comes from. While natural cocoa and acid can produce a reddish-brown hue, vibrant red requires a significant amount of liquid or gel food coloring. Gel food coloring is recommended as it's more concentrated and won't thin out your batter as much as liquid coloring. Each of these ingredients plays a non-negotiable role in achieving the perfect red velvet cupcake recipe. Understanding their function is the first step towards baking success.The Science Behind the Red: Achieving That Iconic Hue
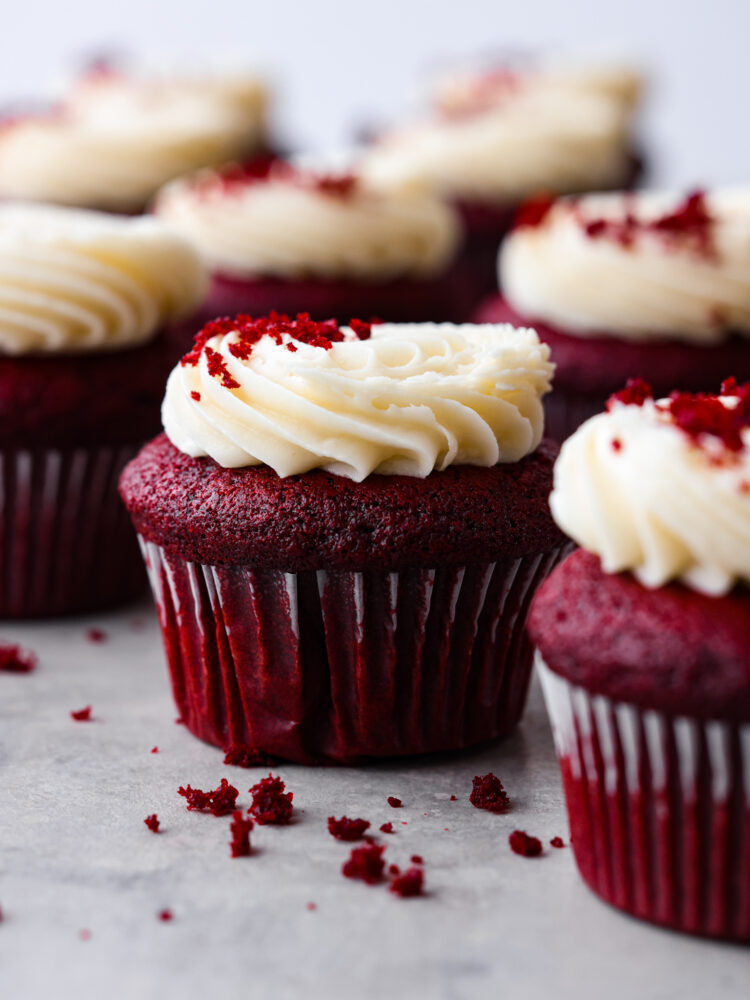
The "red" in red velvet is perhaps its most captivating feature, and achieving that vibrant, deep crimson can feel like a culinary quest. Historically, the reddish-brown color in early red velvet cakes came from the reaction between acidic ingredients (like buttermilk and vinegar) and natural, non-Dutched cocoa powder. Anthocyanins, naturally occurring pigments in cocoa, would turn reddish when exposed to acid. However, modern cocoa processing often reduces these pigments, making it difficult to achieve a truly vibrant red without assistance. This is where red food coloring comes into play. For that striking, unmistakable red velvet hue, a generous amount of food coloring is typically necessary. Gel food coloring is highly recommended over liquid, as it's much more concentrated, meaning you'll need less of it to achieve the desired color without altering the batter's consistency. Liquid food coloring can thin your batter, leading to a less desirable texture. The goal is a rich, deep red, not just a faint blush. Don't be shy with the coloring; it's what makes a red velvet cupcake truly "red velvet." The interplay between the slight bitterness of cocoa, the tang of buttermilk, and the visual pop of red is what defines this classic dessert.Step-by-Step Guide to Baking Flawless Red Velvet Cupcakes
Baking the perfect red velvet cupcake recipe requires precision and patience. Follow these steps meticulously for consistently delightful results.Preparing Your Ingredients and Workspace
Before you even think about mixing, proper preparation is key. This is your "mise en place" moment, a French culinary term meaning "everything in its place." 1. **Bring Ingredients to Room Temperature:** Butter, eggs, and buttermilk should all be at room temperature. This ensures they emulsify properly, creating a smooth, homogenous batter that traps air effectively, leading to a lighter, more tender crumb. Cold ingredients can lead to a lumpy batter and a denser cupcake. 2. **Preheat Oven:** Preheat your oven to the specified temperature (usually 350°F or 175°C). An accurately preheated oven is crucial for even baking and proper rise. Consider using an oven thermometer to verify your oven's true temperature, as many can be inaccurate. 3. **Prepare Muffin Tin:** Line a 12-cup muffin tin with paper liners. This prevents sticking and makes for easy cleanup. 4. **Sift Dry Ingredients:** In a medium bowl, whisk together the flour, cocoa powder, baking soda, and salt. Sifting helps to aerate the flour and ensures all dry ingredients are evenly distributed, preventing pockets of unmixed ingredients.Mixing the Batter to Perfection
This is where the magic of the red velvet cupcake recipe truly begins to unfold. 1. **Cream Butter and Sugar:** In a large bowl, using an electric mixer (stand mixer or hand-held), cream together the softened unsalted butter and granulated sugar until light and fluffy. This process incorporates air, which is essential for a tender cupcake. Scrape down the sides of the bowl frequently to ensure even mixing. 2. **Add Eggs:** Beat in the eggs one at a time, mixing well after each addition. Ensure each egg is fully incorporated before adding the next. 3. **Combine Wet Ingredients:** In a separate small bowl, whisk together the buttermilk, white vinegar, and vanilla extract. Add the red food coloring to this mixture and whisk until the color is uniform and vibrant. This ensures the color is evenly distributed throughout the batter. 4. **Alternate Dry and Wet:** With the mixer on low speed, gradually add the dry ingredients to the creamed mixture, alternating with the buttermilk mixture. Begin and end with the dry ingredients (e.g., 1/3 dry, 1/2 wet, 1/3 dry, 1/2 wet, 1/3 dry). Mix just until combined. Overmixing develops the gluten in the flour, leading to tough, dry cupcakes. A few small lumps are acceptable.Baking for Optimal Texture
The final step before enjoying your delectable creations. 1. **Fill Liners:** Divide the batter evenly among the prepared muffin cups, filling each about two-thirds full. This allows room for the cupcakes to rise without overflowing. 2. **Bake:** Bake in the preheated oven for 18-22 minutes, or until a wooden skewer or toothpick inserted into the center of a cupcake comes out clean or with a few moist crumbs attached. Avoid opening the oven door frequently, as this can cause the cupcakes to sink. 3. **Cool:** Once baked, remove the muffin tin from the oven and let the cupcakes cool in the tin for 5-10 minutes before transferring them to a wire rack to cool completely. Cooling completely before frosting is crucial; otherwise, your frosting will melt.The Cream Cheese Frosting: A Match Made in Heaven
No red velvet cupcake recipe is complete without its iconic companion: the tangy, sweet, and irresistibly creamy cream cheese frosting. This frosting isn't just an adornment; its slight tartness perfectly cuts through the richness of the cupcake, creating a harmonious flavor balance. **Ingredients for Classic Cream Cheese Frosting:** * 8 ounces (226g) cream cheese, full-fat, softened * 1/2 cup (113g) unsalted butter, softened * 4-5 cups (480-600g) powdered sugar (confectioners' sugar), sifted * 1 teaspoon vanilla extract * 1-2 tablespoons milk or cream (optional, for consistency) **Instructions:** 1. **Cream Cheese and Butter:** In a large bowl, using an electric mixer, beat the softened cream cheese and softened butter together until smooth and creamy, with no lumps. This is critical for a smooth frosting. 2. **Add Vanilla:** Beat in the vanilla extract. 3. **Gradually Add Powdered Sugar:** With the mixer on low speed, gradually add the sifted powdered sugar, one cup at a time, mixing until fully incorporated after each addition. Once all sugar is added, increase speed to medium-high and beat until light and fluffy. 4. **Adjust Consistency (Optional):** If the frosting is too thick, add milk or cream, one tablespoon at a time, until desired consistency is reached. If it's too thin, add more sifted powdered sugar.Tips for a Silky Smooth Frosting
* **Softened Ingredients are Key:** Just like with the cupcake batter, ensure your cream cheese and butter are truly softened to room temperature. Cold ingredients will result in a lumpy frosting. * **Sift Powdered Sugar:** Powdered sugar often clumps. Sifting it before adding to the mixture prevents lumps and ensures a smooth, silky texture. * **Don't Overbeat:** While you want the frosting to be light and fluffy, overbeating cream cheese can make it too soft and runny. Beat until just combined and fluffy. * **Chill if Necessary:** If your kitchen is warm or your frosting seems too soft to pipe, chill it in the refrigerator for 15-30 minutes, then re-whip briefly before frosting.Common Pitfalls and How to Avoid Them
Even with the best red velvet cupcake recipe, baking can sometimes present challenges. Here are common issues and how to troubleshoot them: * **Dry Cupcakes:** * **Cause:** Overmixing the batter (develops gluten), overbaking, or too much flour. * **Solution:** Mix just until ingredients are combined. Use a timer and test for doneness with a toothpick. Measure flour accurately, preferably by weight (grams) rather than volume. * **Cupcakes Sinking in the Middle:** * **Cause:** Oven door opened too early, underbaked, too much leavening, or ingredients not at room temperature. * **Solution:** Resist the urge to open the oven door until near the end of baking. Ensure cupcakes are fully baked. Measure leavening agents precisely. * **Color Not Vibrant Enough:** * **Cause:** Not enough red food coloring, or using liquid instead of gel coloring. * **Solution:** Don't be afraid to use a generous amount of high-quality gel food coloring. * **Lumpy Frosting:** * **Cause:** Cold cream cheese or butter, or unsifted powdered sugar. * **Solution:** Ensure all dairy ingredients are at room temperature. Always sift your powdered sugar. * **Frosting Too Runny:** * **Cause:** Overbeating the cream cheese (makes it lose structure), too much liquid (milk/cream), or too warm. * **Solution:** Beat cream cheese and butter until just combined before adding sugar. Add liquid sparingly. If it becomes too runny, chill for 30 minutes, then add more sifted powdered sugar and re-whip briefly. * **Cupcakes Sticking to Liners:** * **Cause:** Liners not high quality, or not allowing cupcakes to cool slightly in the tin before transferring to a wire rack. * **Solution:** Use good quality, grease-proof paper liners. Allow 5-10 minutes of cooling in the tin before moving to a rack. Understanding these common issues and their solutions empowers you to confidently tackle any baking challenge, ensuring your red velvet cupcake recipe yields perfect results every time.Elevating Your Red Velvet Experience: Creative Variations & Serving Suggestions
While the classic red velvet cupcake recipe is perfect as is, there are always ways to add your personal touch or present them beautifully. Think of it as adding unique fashion pieces to an outfit – a (RED) style gift pick can make a stunning statement, just as a creative twist can elevate your cupcakes. * **Garnishes:** Beyond the classic frosting, consider adding a sprinkle of cocoa powder, chocolate shavings, or even some fresh raspberries or strawberries for a pop of color and freshness. A few red sprinkles can also enhance the festive look. * **Flavor Twists:** * **Orange Zest:** A hint of orange zest in the batter can brighten the flavor profile. * **Espresso Powder:** A teaspoon of instant espresso powder added to the cocoa mixture can deepen the chocolate flavor without making it taste like coffee. * **Nutty Crunch:** Finely chopped pecans or walnuts can be folded into the batter for a textural contrast. * **Mini Cupcakes:** For parties or portion control, bake them as mini cupcakes, adjusting baking time accordingly (usually 10-15 minutes). * **Serving Suggestions:** Red velvet cupcakes are perfect for birthdays, holidays, or just a sweet pick-me-up. Serve them with a cup of coffee, tea, or a glass of cold milk. They also make wonderful homemade gifts.Community Wisdom: Baking Tips from Fellow Enthusiasts
One of the most valuable resources for any baker, whether a novice or an expert, is the collective wisdom of online communities. Platforms like Reddit, for instance, are vast networks where people can dive into their interests, hobbies, and passions. There's a community for whatever you're interested in on Reddit, and baking is no exception. Subreddits like r/baking or r/recipes are thriving hubs where home bakers share their triumphs, seek advice on troubleshooting, and exchange tips on everything from achieving the perfect crumb to making a stable cream cheese frosting. You'll find countless threads discussing the best red velvet cupcake recipe variations, the ideal brand of food coloring, or how to prevent cupcakes from sinking. This shared knowledge, often born from trial and error, is incredibly valuable. It's a place where you can ask specific questions, get feedback on your baking challenges, and even find inspiration for new creations. Engaging with these communities can provide insights that go beyond standard recipe instructions, offering practical advice directly from those who've been in the trenches of baking. It's a testament to the power of shared passion, much like how (RED) partners sound the alarm on global health injustices, mobilizing communities to fight for a common cause. In a similar vein, baking communities empower individuals to achieve their culinary goals, making every baking journey a little less daunting and a lot more enjoyable.Storage and Shelf Life: Keeping Your Cupcakes Fresh
Proper storage is essential to maintain the freshness and delightful texture of your red velvet cupcakes. Due to the cream cheese frosting, these cupcakes require refrigeration. * **At Room Temperature (Unfrosted):** Unfrosted red velvet cupcakes can be stored in an airtight container at room temperature for up to 2 days. * **Refrigerated (Frosted):** Once frosted, store the cupcakes in an airtight container in the refrigerator for up to 3-4 days. The cream cheese frosting needs to be kept cold to prevent spoilage and maintain its structure. * **Bringing to Room Temperature:** For the best flavor and texture, remove the refrigerated cupcakes about 30 minutes to an hour before serving to allow them to come closer to room temperature. The frosting will soften slightly, and the cake will become more tender. * **Freezing:** Both frosted and unfrosted cupcakes can be frozen. * **Unfrosted:** Wrap individual unfrosted cupcakes tightly in plastic wrap, then place them in a freezer-safe bag or container for up to 3 months. Thaw at room temperature before frosting. * **Frosted:** For frosted cupcakes, first freeze them uncovered on a baking sheet until the frosting is firm (about 1-2 hours). Then, wrap each cupcake individually in plastic wrap, followed by aluminum foil, and store in a freezer-safe container for up to 1 month. Thaw in the refrigerator overnight, then bring to room temperature before serving. By following these storage guidelines, you can ensure that every red velvet cupcake you serve is as fresh and delicious as the moment it was baked.Conclusion
Baking the perfect red velvet cupcake recipe is a rewarding endeavor, yielding a dessert that is as beautiful to behold as it is delightful to taste. We've explored the essential ingredients, delved into the science behind that iconic red hue, and walked through a detailed step-by-step baking process. From preparing your workspace to mastering the art of cream cheese frosting, and even troubleshooting common baking pitfalls, you now possess the knowledge to create these beloved treats with confidence and expertise. Remember, baking is a journey of continuous learning and experimentation. Don't be afraid to try new techniques or explore variations to make this classic recipe truly your own. Whether you're baking for a special occasion or simply to satisfy a craving, the joy of sharing homemade red velvet cupcakes is unparalleled. We encourage you to put this guide into practice and experience the magic for yourself. Have you tried this red velvet cupcake recipe? Share your baking triumphs and tips in the comments below! If you found this guide helpful, please consider sharing it with fellow baking enthusiasts, and explore our other delicious recipes for more culinary inspiration. Happy baking!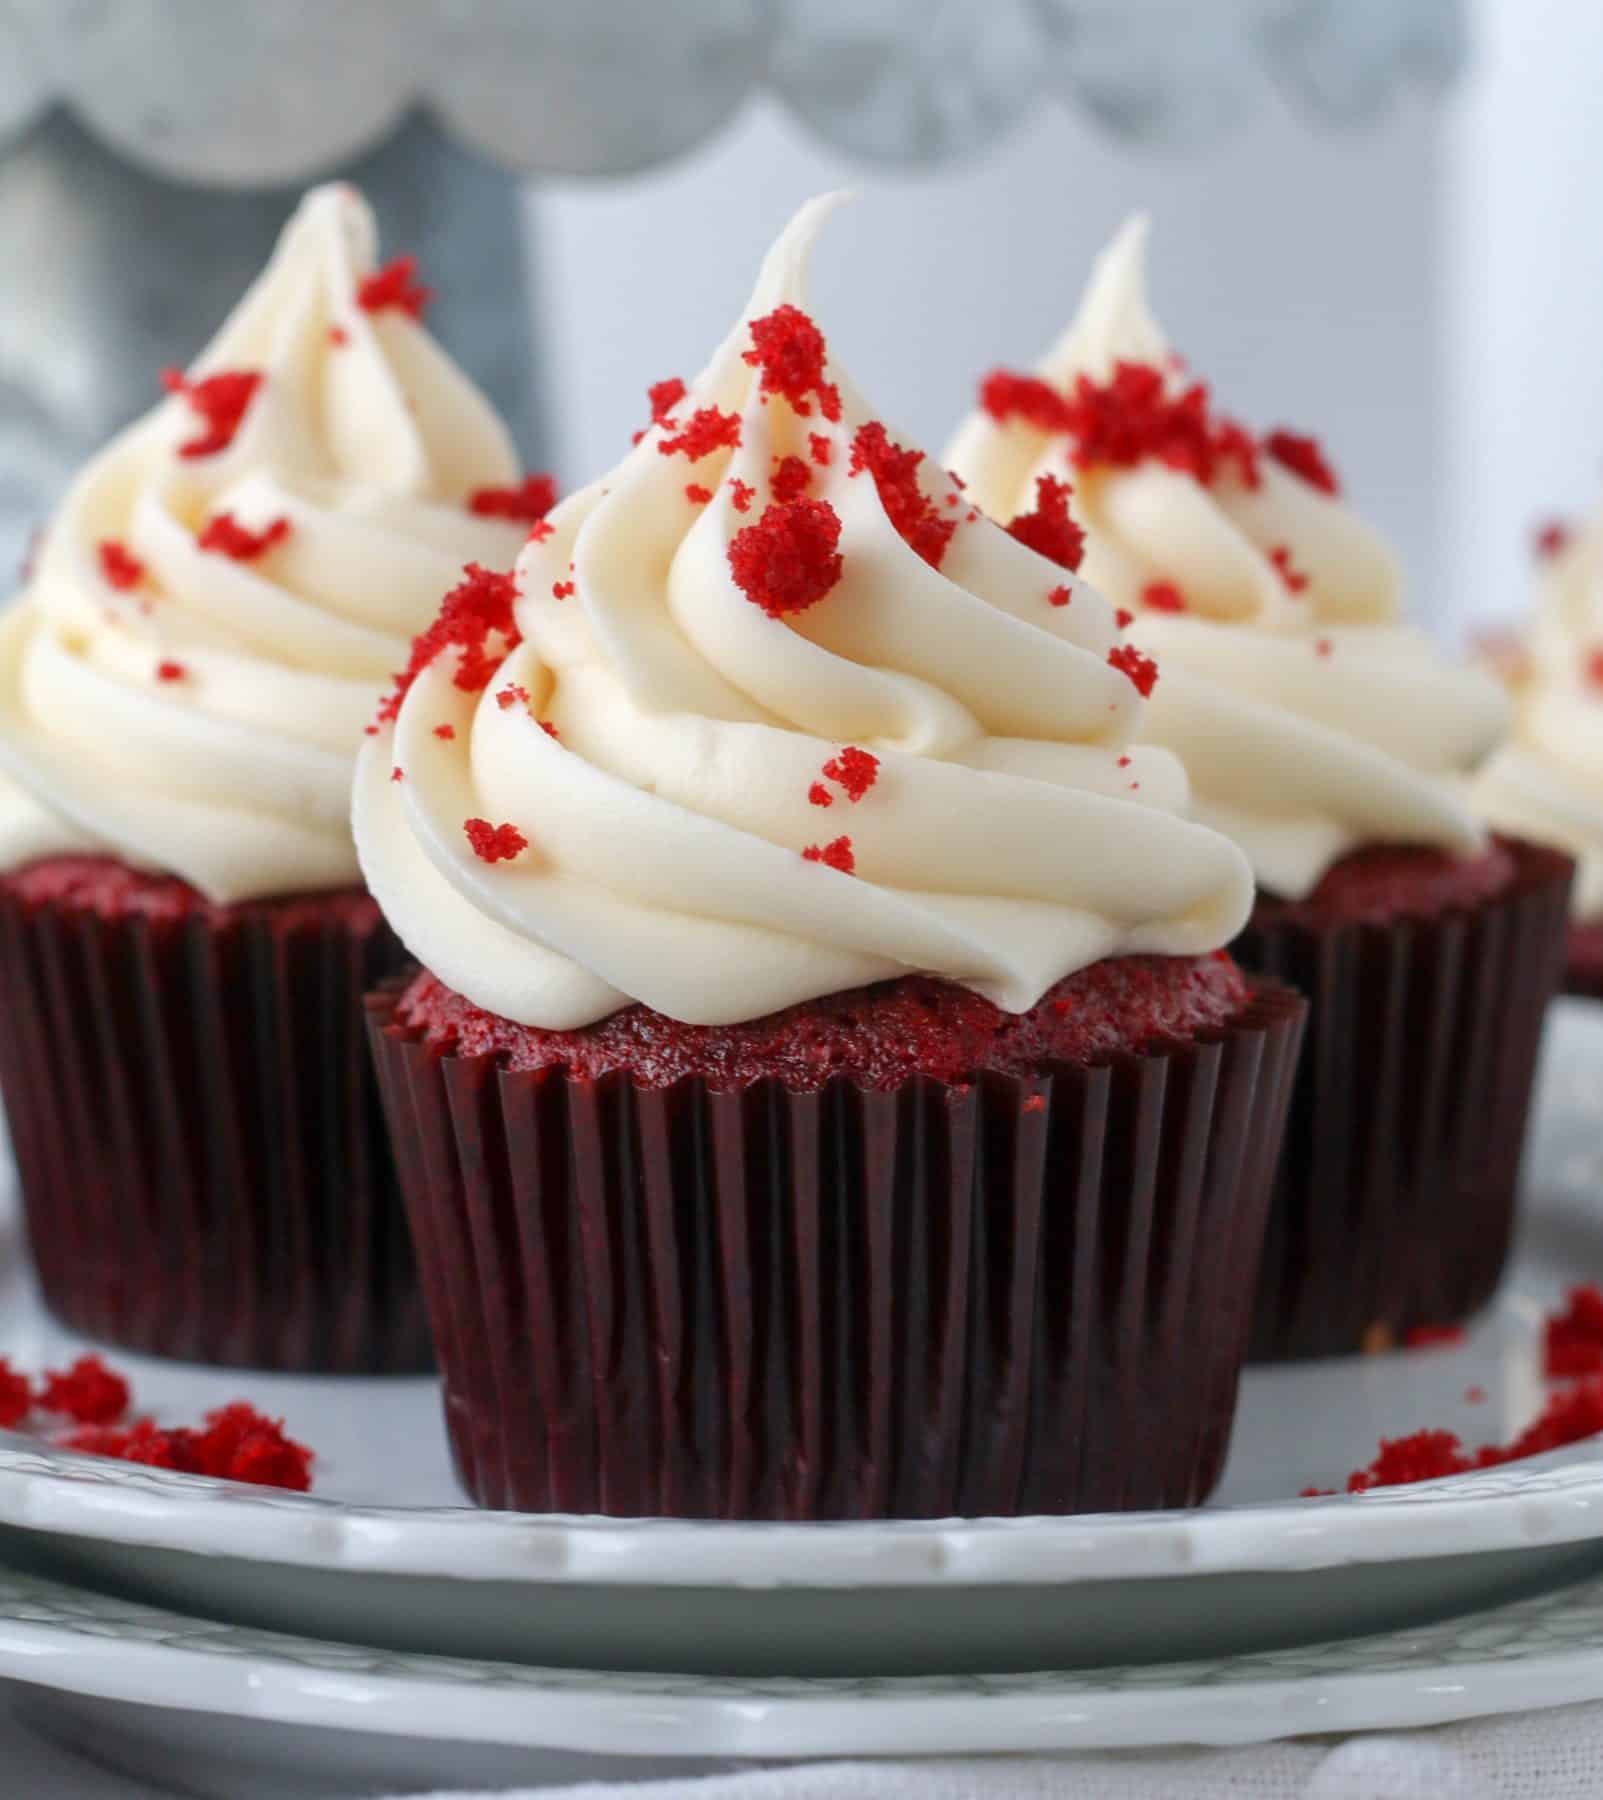
Easy Red Velvet Cupcake Recipe - Boston Girl Bakes

Red Velvet Cupcakes with Best-Ever Cream Cheese Frosting
Red Velvet Cupcakes Recipe | The Recipe Critic
