How To Draw A Dolphin: Your Easy Guide To Lifelike Marine Art
Have you ever gazed at a majestic dolphin leaping from the ocean waves and wished you could capture that grace on paper? Drawing these intelligent and playful creatures might seem daunting at first, but with the right guidance, it's an incredibly rewarding experience. This comprehensive guide will show you how to draw a dolphin, making the process enjoyable and accessible for everyone, regardless of your current artistic skill level.
Whether you're a budding artist, a parent looking for a fun activity with your "little artists," or simply someone who wants to unleash their inner creativity, you're in the right place. We'll break down the process into simple, manageable steps, providing you with the confidence and techniques needed to bring these beloved marine mammals to life on your canvas. Forget complex theories; we're focusing on practical, easy-to-follow methods that will have you sketching stunning dolphins in no time. Imagine drawing the perfect dolphin with ease – it's more achievable than you think!
Table of Contents
- Why Learn How to Draw a Dolphin?
- Essential Tools for Your Dolphin Drawing Journey
- Understanding Dolphin Anatomy for Realistic Drawing
- Method 1: The Simple, Cartoon Dolphin for Beginners
- Method 2: Drawing a Realistic Dolphin in Nine Steps
- Advanced Tips for Bringing Your Dolphin to Life
- Common Mistakes and How to Avoid Them
- Practice Makes Perfect: Embracing Your Artistic Journey
Why Learn How to Draw a Dolphin?
Learning how to draw a dolphin isn't just about putting lines on paper; it's about connecting with nature, developing fine motor skills, and fostering creativity. Dolphins, with their sleek bodies and intelligent expressions, are fascinating subjects. For children, it can spark an interest in marine biology and conservation. For adults, it offers a mindful escape, a chance to relax and focus on a creative task. The satisfaction of seeing your own rendition of a dolphin emerge from a blank page is truly unparalleled. It’s an accessible art form that doesn't require expensive equipment or years of training. All it takes is a pencil or pen, some paper, and a little practice. Plus, mastering how to draw a dolphin lays a fantastic foundation for drawing other animals, as it teaches you about form, proportion, and movement.Essential Tools for Your Dolphin Drawing Journey
Before we dive into the exciting process of how to draw a dolphin, let's gather our simple yet effective tools. You don't need a professional art studio; basic supplies are more than enough to get started.- Pencils: A standard HB pencil is great for initial sketches. For adding depth and shading, you might want to consider a 2B or 4B pencil (softer, darker lines) and a 2H or 4H pencil (harder, lighter lines for initial construction).
- Paper: Any drawing paper will do. A smooth surface is generally easier for beginners.
- Eraser: A good quality kneaded eraser or a plastic eraser is essential for correcting mistakes and lightening lines without damaging the paper.
- Optional:
- Blending Stump or Cotton Swab: For smooth shading.
- Ruler: For very initial guiding lines, though freehand is encouraged for organic shapes.
- Reference Images: Looking at photos of real dolphins will greatly help you understand their form and movement.
Understanding Dolphin Anatomy for Realistic Drawing
To truly capture the essence of a dolphin, especially when aiming for a realistic depiction, a basic understanding of their anatomy is incredibly helpful. Dolphins are streamlined creatures, perfectly adapted for life in the water. Their bodies are designed for speed and agility, which is reflected in their smooth, torpedo-like shape.Key Proportions and Silhouettes
The overall silhouette of a dolphin is crucial. They have a relatively large head that tapers into a distinct snout (rostrum), a sleek body that narrows towards the tail, and a powerful fluke (tail fin). When you learn how to draw a dolphin, think of it as a series of connected ovals and curves that flow seamlessly into one another.- Head: Often appears somewhat blunt or rounded, leading to the snout.
- Body: The thickest part is around the middle, tapering towards both ends.
- Tail Stock: The narrow section just before the fluke, which is incredibly muscular.
Fins, Flukes, and Features
Each part of the dolphin contributes to its unique appearance and movement.- Dorsal Fin: Located on their back, it's typically triangular or falcate (sickle-shaped) and helps with stability. Its position and shape can vary slightly between species.
- Pectoral Fins: These are the two fins on their sides, used for steering and balance. They resemble human arms in their skeletal structure.
- Fluke (Tail Fin): Unlike fish, a dolphin's fluke is horizontal, moving up and down to propel them through the water. It's broad and powerful, often notched in the center.
- Eyes: Small and located on the sides of their head, giving them good peripheral vision.
- Melon: The rounded forehead of a dolphin, which is used for echolocation.
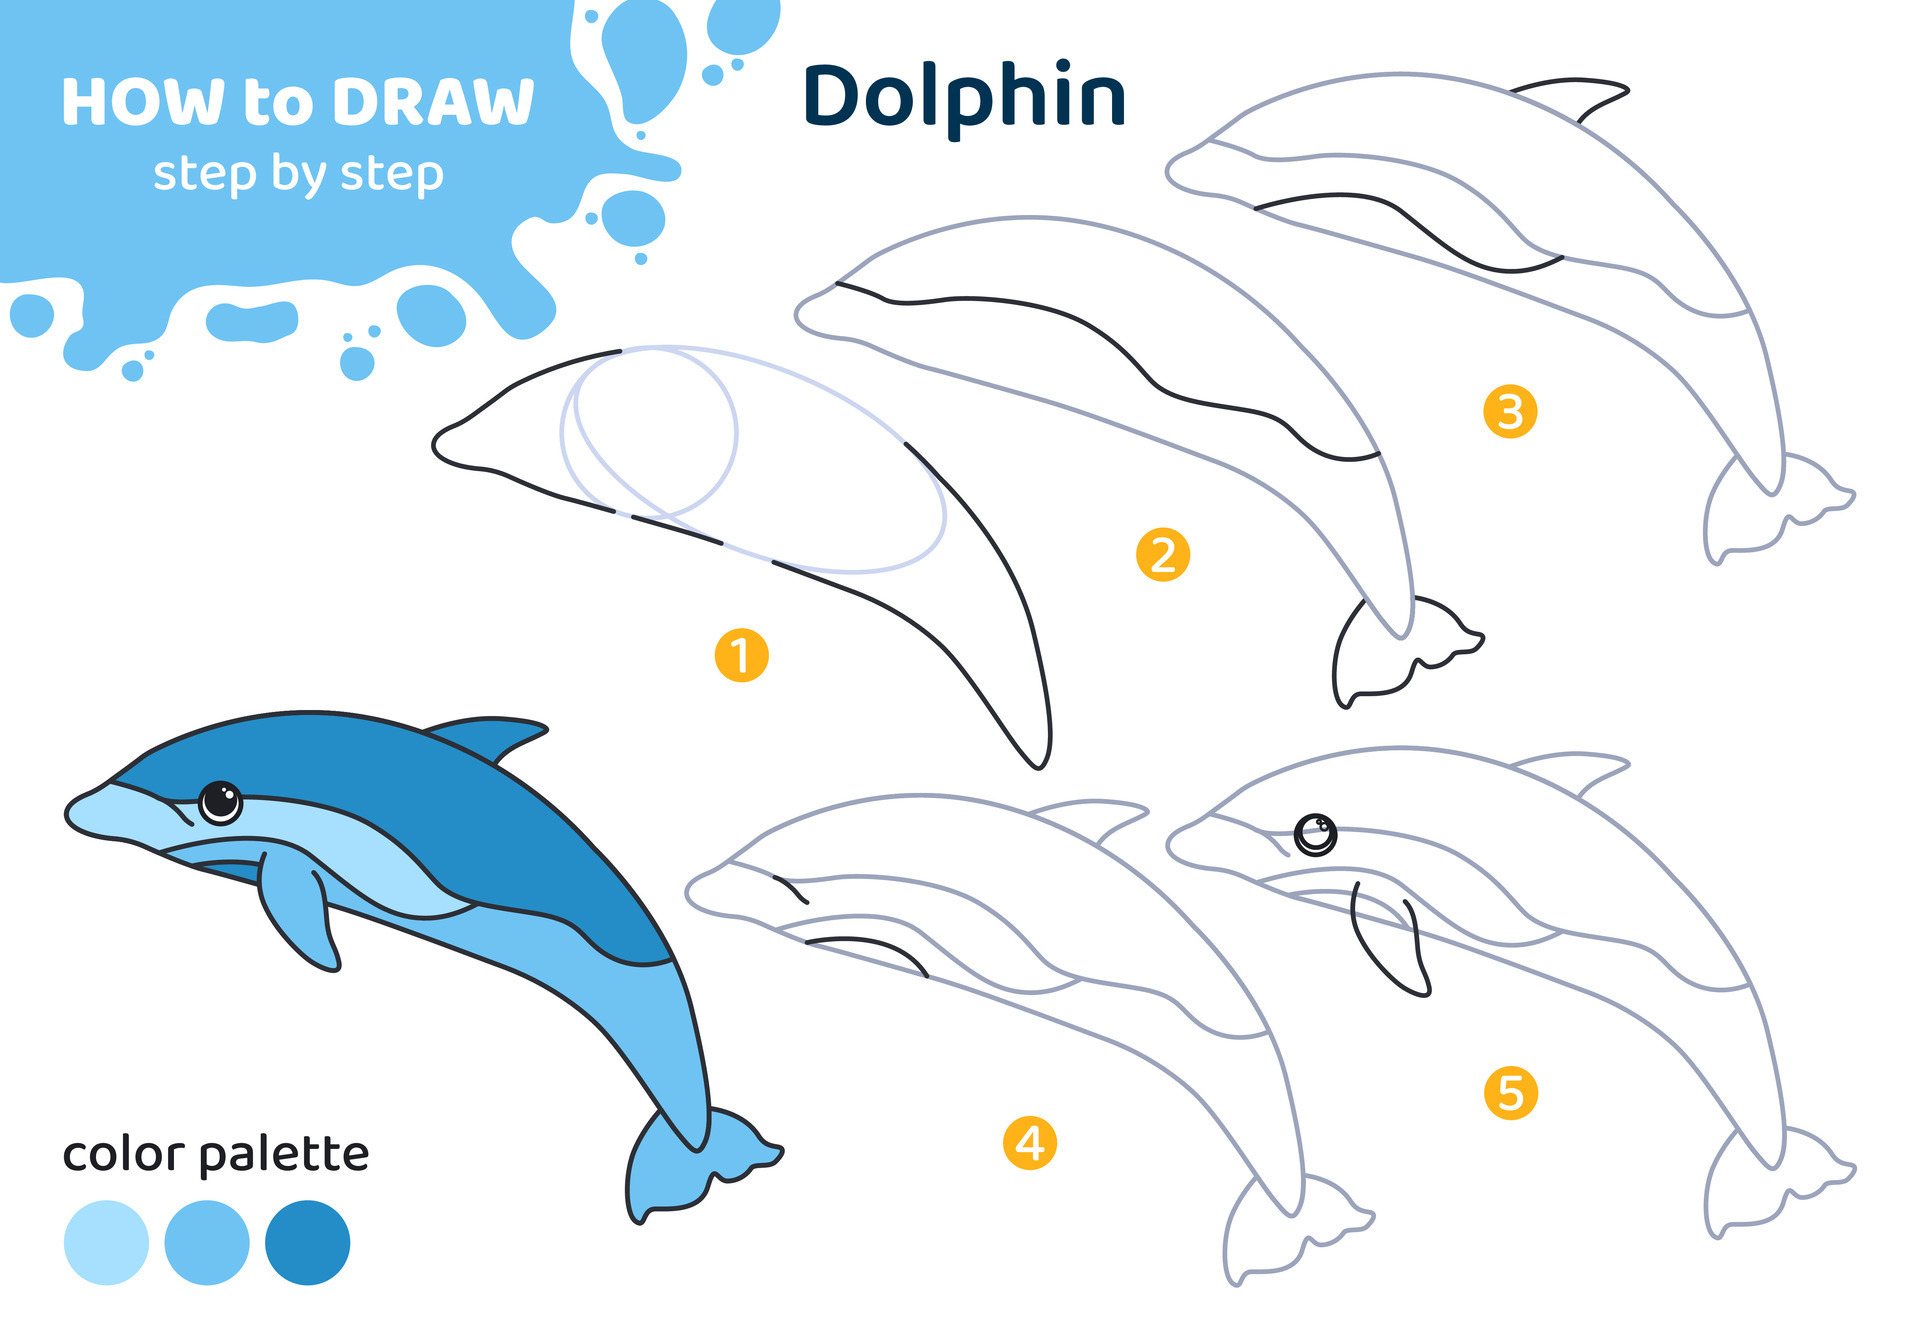
Method 1: The Simple, Cartoon Dolphin for Beginners
For those just starting out, or for "little artists" eager to get a quick win, we'll begin with a simplified, cartoonish approach to how to draw a dolphin. This method focuses on basic shapes and minimal detail, making it incredibly easy to do. All it takes is a pencil or pen, some paper, and a little practice. Beginners will benefit immensely from this simple step-by-step lesson for learning how to draw a dolphin.Step-by-Step Breakdown: Simple Dolphin
This engaging drawing guide will show you how to draw a dolphin from start to finish.- Start with the Body Arc: Begin by drawing a large, gentle arc pointing downwards. This will form the top curve of your dolphin's back. Think of it as a smooth, elongated rainbow shape.
- Add the Underside Curve: Below the first arc, draw another, slightly flatter arc that connects to the ends of the first one. This creates the basic oval-like body shape. Don't worry about perfection; just aim for a smooth, closed shape.
- Draw the Snout: At one end of your body shape (this will be the front), add a small, rounded protrusion for the dolphin's snout. It should extend slightly from the main body.
- Sketch the Dorsal Fin: On the top arc of the body, roughly in the middle, draw a simple triangle for the dorsal fin. Make sure it points upwards.
- Add the Pectoral Fin: On the underside of the body, near the front, draw a simple, curved teardrop shape for one of the pectoral fins.
- Create the Fluke (Tail Fin): At the back end of the body, draw a horizontal V-shape or a slightly curved "M" shape for the tail fluke. Make it broad and symmetrical.
- Refine and Erase: Go over your lines to make them smoother and more defined. Erase any initial construction lines that are no longer needed.
- Add Eye and Mouth: Draw a small circle for the eye near the base of the snout and a simple curved line for the mouth, giving your dolphin a friendly expression.
- Final Touches: You can add a few small lines to suggest water or a simple shading if you like. Your simple dolphin is complete!
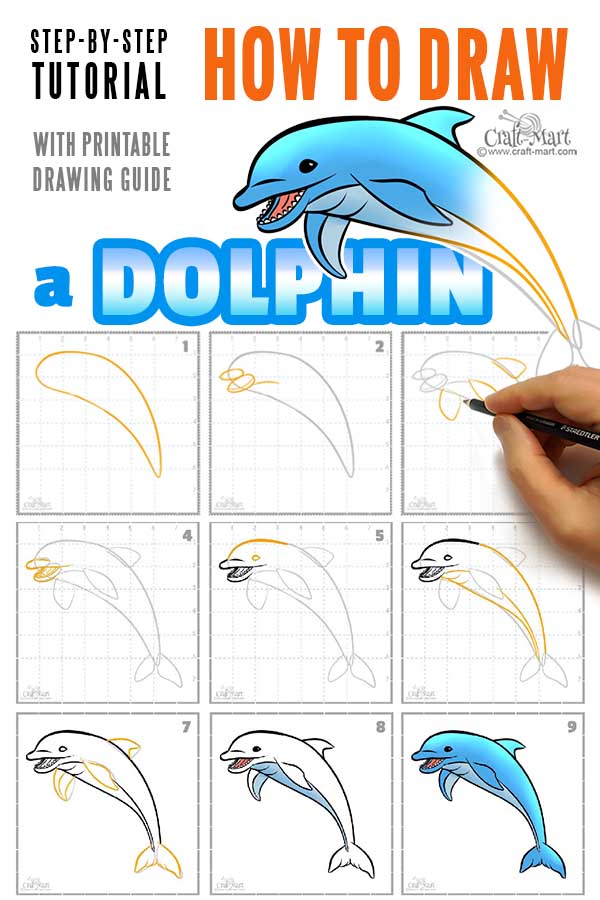
Method 2: Drawing a Realistic Dolphin in Nine Steps
Now that you've mastered the basic form, let's dive into how to draw a dolphin with a more realistic approach. This tutorial shows how to draw a dolphin in nine steps, providing a detailed breakdown of the drawing process with explanations and illustrated examples. The focus of the tutorial is on capturing the fluid motion and anatomical accuracy of these incredible creatures.The Foundational Shapes
Realism begins with understanding the underlying structure. We'll start with very light lines, which you can erase later.- The Core Body Arc: Start with a large line in an arc pointing downwards. This will be the spine and the primary curve of the dolphin's back. Make it graceful and long.
- The Underside Curve and Head Block: Below the first arc, draw another, shallower arc for the belly, connecting it to the back arc. At the front, define a slightly rounded block for the head, extending from the main body shape. Think of it as a large, elongated teardrop or a very smooth, slightly bent banana shape.
- Defining the Snout and Melon: From the head block, extend a distinct, but not overly pointed, snout (rostrum). Above the snout, create the rounded "melon" shape, which gives the dolphin its characteristic forehead.
- Initial Fin Placement (Dorsal and Pectoral): Lightly sketch the general placement and size of the dorsal fin on the back curve. It's usually about halfway down the body. For the pectoral fin, place it on the underside, just behind the head. These are just placeholders for now.
- The Tail Stock and Fluke Base: Narrow the body significantly towards the back to form the tail stock. At the very end, draw a horizontal line for the base of the fluke. This line should be relatively wide, indicating the power of the tail.
Refining the Outline and Adding Depth
With the basic structure in place, we'll start adding details and bringing your dolphin to life.- Refining the Body Outline: Now, go over your light construction lines, refining the smooth, sleek curves of the dolphin's body. Make the lines flow seamlessly, eliminating any sharp angles. Pay attention to the subtle bulge of the chest and the graceful taper towards the tail.
- Drawing the Fins and Fluke:
- Dorsal Fin: Give the dorsal fin its characteristic falcate (sickle-like) or triangular shape, making sure its base blends smoothly into the back.
- Pectoral Fins: Draw the pectoral fins as elongated, somewhat pointed ovals, ensuring they look natural against the body. Remember they are used for steering.
- Fluke: Carefully draw the two lobes of the fluke, making them broad and powerful. Most dolphin species have a noticeable notch in the center of their fluke.
- Adding Facial Features and Details:
- Eye: Place a small, dark eye just above and slightly behind the corner of the mouth line.
- Mouth Line: Draw the mouth line, which often curves slightly upwards, giving dolphins their "smiling" appearance.
- Blowhole: Don't forget the blowhole on top of the head, slightly behind the melon. It's usually a small, slit-like opening.
- Coloration Line: Dolphins often have a distinct countershading pattern – dark on top, light on the bottom. Lightly sketch a wavy line along the side of the body to indicate this transition.
- Shading and Texture (Bringing it to Life): This is where your dolphin truly gains depth.
- Light Source: Decide where your light source is coming from. Areas facing the light will be brighter, and areas opposite will be darker.
- Smooth Shading: Use soft, even strokes to shade the darker areas of the dolphin's body, particularly the top half and any areas in shadow (e.g., underside of fins, parts of the belly furthest from the light). Blend your shading for a smooth, realistic look.
- Highlights: Leave some areas bright to suggest reflections, especially on the top of the back and melon, giving it that wet, sleek appearance.
- Subtle Texture: You can add very subtle, almost imperceptible lines to suggest the smooth, taut skin, but avoid making it look rough.
Advanced Tips for Bringing Your Dolphin to Life
Once you're comfortable with the basic and realistic methods of how to draw a dolphin, you can explore techniques to add even more dynamism and realism to your artwork.- Capture Movement: Dolphins are incredibly agile. Instead of drawing a static dolphin, try to capture them in motion – leaping, diving, or swimming. This involves dynamic curves and foreshortening (drawing objects as if they are receding into the distance). Observe how their bodies bend and twist.
- Water Effects: Adding water around your dolphin can significantly enhance the drawing. Think about:
- Splashes: If the dolphin is breaching, draw irregular, upward-flickering lines and shapes for splashes.
- Ripples: Concentric circles or wavy lines around the dolphin suggest it's moving through water.
- Reflections: If part of the dolphin is underwater, consider how light would distort its reflection.
- Lighting and Shadow Play: Experiment with dramatic lighting. A strong light source can create deep shadows and bright highlights, giving your dolphin a three-dimensional feel. Consider dappled light if drawing underwater, or bright sunlight if above the surface.
- Background Elements: A simple background, like a horizon line or a hint of underwater scenery (like faint coral or distant light rays), can add context and depth to your dolphin drawing.
- Practice Different Angles: Don't always draw a dolphin from the side. Try drawing them from above, below, or head-on to challenge yourself and deepen your understanding of their form.
Common Mistakes and How to Avoid Them
Learning how to draw a dolphin, like any artistic endeavor, comes with its own set of common pitfalls. Being aware of these can help you improve faster.- Stiff or Rigid Forms: Dolphins are fluid creatures. A common mistake is drawing them too stiff or straight. Always think in curves and dynamic lines. Avoid sharp angles unless they are for a specific, intentional effect.
- Incorrect Proportions: Sometimes, the head might be too big or too small, or the fins might be out of scale with the body. Use your initial light construction lines to establish correct proportions before committing to darker lines. Referencing real dolphin photos helps immensely.
- Flatness: Without proper shading, your dolphin can look two-dimensional. Remember to use varying pressure on your pencil and blend to create highlights and shadows, giving the illusion of form and volume.
- Generic Fins/Fluke: While simple shapes work for cartoon dolphins, realistic dolphins require more attention to the specific shape and curve of their dorsal, pectoral, and caudal (fluke) fins. Observe their subtle curves and how they attach to the body.
- Lack of Movement: A static pose can make a dolphin look lifeless. Even if it's not leaping, a slight curve or tilt can suggest motion.
- Over-detailing Too Soon: Don't jump into drawing eyes and mouth before you have the overall form correct. Build your drawing from large shapes to small details.
Practice Makes Perfect: Embracing Your Artistic Journey
The journey of learning how to draw a dolphin, or any subject, is continuous. It's not about achieving perfection in one go, but about consistent practice and enjoying the process. Remember, "it's easy to do, and all it takes is a pencil or pen, some paper, and a little practice." Don't be discouraged if your first few attempts aren't exactly what you envisioned. Every line you draw, every shape you sketch, is a step forward. Think of each drawing session as an exploration. Try drawing dolphins of different sizes, in different poses, or from various angles. Experiment with different shading techniques or even adding color. The more you practice, the more intuitive the process will become, and the more confident you'll feel in your ability to how to draw a dolphin that truly reflects their beauty and grace.Conclusion
You've now discovered how to draw a dolphin by following along with this engaging drawing guide, exploring both simple and realistic methods. From the initial arc to the final touches of shading, we've broken down the process into manageable steps, proving that anyone can capture the elegance of these marine wonders. We've covered essential tools, key anatomical insights, step-by-step instructions for two distinct styles, and valuable tips for refining your artwork. Remember, the true joy of drawing lies in the journey, not just the destination. Keep practicing, keep observing, and most importantly, keep having fun! Your unique artistic voice will shine through with every dolphin you draw. We hope this guide has inspired you to pick up your pencil and embark on many more creative adventures. What was your favorite part of learning how to draw a dolphin? Share your thoughts and your creations in the comments below! We'd love to see your progress and hear about your artistic journey. Feel free to explore other drawing tutorials on our site to continue honing your skills and discovering new subjects to bring to life.
How To Draw A Dolphin - Quick and Easy Steps | Zeichnen, Kinder, Malen
How To Draw A Dolphin Step By Step For Kids
212-how-to-draw-a-dolphin-tutorial - Craft-Mart
